FIXMATE · BATHROOM MAINTENANCE AND MINOR REPAIRS
Bathroom Silicone Sealant Replacement – Prices, Steps and Practical Advice
When should bathroom silicone sealant be replaced, why do silicone joints turn black, and how much does professional silicone replacement cost? This guide explains the most common warning signs, the correct replacement process, and typical prices in Finland.
Bathroom silicone joints are exposed to demanding conditions every day. Shower water, temperature changes, cleaning products, and repeated moisture gradually affect the sealant. A properly installed silicone joint remains flexible, adheres securely to the surrounding surfaces, and protects and finishes the connection between walls, floors, and bathroom fixtures.
Over time, however, silicone may lose flexibility, separate from the tiles, develop cracks, or become discoloured by mould and dirt. When this happens, cleaning alone may no longer be enough, and replacing the old silicone may be the most practical solution.
Fixmate provides professional bathroom and kitchen silicone sealing services in Helsinki, Espoo, and Vantaa. Send us photographs of your existing silicone joints, and we can help assess the required work and provide a price estimate before scheduling a visit.
When Should Bathroom Silicone Sealant Be Replaced?
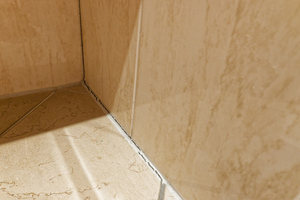
Bathroom silicone does not necessarily need replacing after a fixed number of years. Its actual condition is more important than its age. In particular, silicone joints around shower corners, tiled floors, and wall connections should be checked regularly because they are frequently exposed to moisture.
Several visible warning signs can indicate that silicone replacement is necessary.
- Black spots or mould growth: If discolouration cannot be removed by proper cleaning and appears embedded inside the silicone, replacement is often the most effective option.
- Silicone separating from the surface: When the edges lift away from tiles or fixtures, gaps may form where moisture and dirt can accumulate.
- Cracking or hardening: Silicone gradually loses elasticity. Once the joint becomes brittle or cracks, it may no longer function as intended.
- Yellowing or noticeable discolouration: Changes in colour do not always indicate damage, but combined with other warning signs, they may suggest that maintenance is needed.
- Missing or uneven sections: Previous repairs, poor installation, or ageing can leave gaps, irregular surfaces, or areas where silicone has failed to adhere properly.
It is also important to distinguish ordinary silicone deterioration from a more serious bathroom problem. Swollen materials, loose tiles, persistent unpleasant odours, or signs of moisture damage may indicate that replacing silicone alone will not solve the underlying issue.
In such situations, the condition of the affected area should be investigated before cosmetic repairs are performed.
How Often Should Bathroom Silicone Be Replaced?
Bathroom silicone replacement is often discussed in terms of a lifespan of approximately 3–7 years. However, this is only a general maintenance guideline rather than a fixed replacement deadline for every home.
The actual lifespan depends on several factors, including the quality of the silicone, installation method, ventilation, frequency of use, cleaning habits, and the amount of time bathroom surfaces remain wet.
For example, silicone joints in a shower used several times per day may deteriorate faster than those surrounding a bathroom sink that receives less direct water exposure.
Even newly installed silicone may fail prematurely if applied to a wet, dirty, or improperly prepared surface. On the other hand, a carefully installed joint that is regularly maintained may remain in good condition for many years.
Practical maintenance tip: Inspect silicone joints around shower corners, floors, walls, and sinks several times a year. During regular bathroom cleaning, check whether the silicone remains flexible, intact, and securely attached to both surfaces.
What Does Silicone Sealant Do – and What Does It Not Do?
Silicone sealant provides a flexible joint between different surfaces and materials. In bathrooms, it is commonly used in internal wall corners, floor-to-wall connections, shower screen joints, and around certain bathroom fixtures.
Because silicone remains elastic, it can accommodate small movements between connected surfaces. A properly installed joint also helps prevent water and dirt from entering the visible connection.
However, silicone sealant is not the primary waterproofing system of a bathroom.
In a properly constructed tiled wet room, waterproofing is provided by a separate system located beneath the tiles. Replacing the silicone joints does not repair damaged waterproofing or eliminate moisture problems inside the structure.
This distinction is especially important when removing old silicone from floor-to-wall connections. Sharp tools must be used carefully because cutting too deeply can damage the waterproofing layer or other materials behind the visible joint.
If the construction of the joint is unclear, or if there is a risk of damaging waterproofing, the work should be assessed by a qualified professional before attempting extensive removal.
Important for apartment buildings: If you suspect moisture damage or the work may affect waterproofing, contact the building manager (isännöitsijä) or the responsible housing-company representative before proceeding. Replacing a surface silicone joint and repairing bathroom waterproofing are two different types of work.
How to Remove Old Silicone Sealant from a Shower
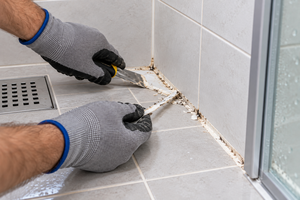
Successful silicone replacement begins with careful removal of the old material. Applying fresh silicone directly over cracked, loose, or mould-stained sealant is generally not a durable solution.
Old silicone residue can prevent proper adhesion, produce an uneven finish, and conceal problems that should have been addressed before resealing.
Professional silicone removal normally includes the following steps.
- Inspecting the work area. The installer identifies which joints need replacement and checks for visible signs of other damage. The shower should not be used while preparation work is taking place.
- Carefully removing old silicone. Suitable removal tools are used to loosen and remove the existing sealant. The work must be performed without cutting deeply into the underlying construction.
- Removing remaining silicone residue. Loose fragments and layers that could reduce adhesion must be removed from the joint surfaces. Any chemical removal products must be compatible with the surrounding materials.
- Cleaning the connection. Dust, dirt, soap deposits, and grease are removed using appropriate cleaning methods. Surface mould contamination may also require treatment.
- Allowing the surfaces to dry. New silicone should not be applied to wet joint surfaces. If moisture is suspected deeper within the structure, the situation must be assessed separately.
The difficulty of removal depends on the location and condition of the joint. Silicone around glass shower screens, narrow corners, and tightly adhered old sealant may require considerably more time than an easily accessible straight joint.
Different surface materials may also require different tools and cleaning methods to avoid damage.
Applying and Finishing New Bathroom Silicone Sealant
Once the old silicone has been removed and the joint is clean and dry, the next step is selecting a suitable sanitary silicone product.
The correct choice depends on the manufacturer's instructions, the surrounding materials, joint dimensions, and the desired appearance. Common colours include white, grey, transparent, and shades designed to match tile grout.
Proper joint dimensions are essential. Silicone that is applied too thinly, packed too deeply, or attached to inappropriate surfaces may lose its flexibility or fail prematurely.
Depending on the construction, a professional installer may need to use backing material to control joint depth and maintain the intended movement characteristics.
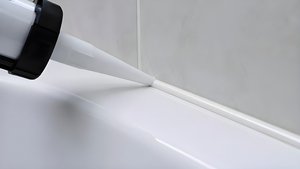
The surrounding surfaces are prepared, the silicone is applied evenly, and the joint is shaped and finished according to the product manufacturer's instructions.
A correctly finished silicone joint should have a smooth, consistent appearance without unnecessary gaps or interruptions.
However, appearance is only one aspect of a successful installation. Proper adhesion to the joint surfaces and sufficient flexibility are equally important for long-term performance.
After application, the installer checks the finished joint, removes protective materials where appropriate, and cleans away excess sealant.
Can new silicone be applied over old silicone? When an existing joint has deteriorated or started separating from the surface, the old material should generally be removed. Adding another layer may temporarily hide the problem without restoring proper adhesion.
Where Is Silicone Sealant Replacement Needed in a Home?
Bathroom silicone replacement does not always mean resealing an entire room. Sometimes only one shower corner, the lower edge of a glass partition, or a connection behind a sink needs attention.
In other situations, several joints have deteriorated and replacing them during the same visit may be more practical.
Fixmate provides silicone replacement services for different areas of the home, including bathrooms, showers, toilets, and kitchens.
Replacement of silicone joints in shower corners, floor-to-wall connections, and areas around shower screens exposed to moisture.
Maintenance of the connection between the toilet base and floor when resealing is necessary and compatible with the installation method.
Renewing silicone along kitchen worktops, wall connections, and other joints exposed to splashes and moisture.
Resealing the edges of a kitchen sink when existing silicone has deteriorated, cracked, or separated from the surrounding surfaces.
If several silicone joints need attention, you can also explore our general bathroom and kitchen silicone sealing service.
Sending photographs of all the affected areas helps us assess whether the work can be combined into a single appointment.
How Much Does Bathroom Silicone Replacement Cost in Helsinki, Espoo and Vantaa?
The cost of silicone replacement depends mainly on the length, location, and condition of the existing joints. Replacing silicone around a single shower corner is a different task from resealing multiple connections throughout a bathroom.
The amount of old silicone that must be removed, access to the work area, cleaning requirements, and any special materials can also affect the estimate.
The table below provides indicative prices based on the examples published on Fixmate's service pages. These amounts should not be interpreted as fixed quotations for every property.
| Type of work | Estimated price | Main factors affecting the cost |
|---|---|---|
| Small silicone joint repair or replacement | €80–120 | One small, easily accessible joint or connection. |
| Shower corner silicone replacement | €120–200 | Size of the shower corner, condition of the old silicone, and accessibility. |
| Bathroom silicone replacement work | €120–250 | Number and total length of joints requiring replacement. |
| Extensive bathroom silicone resealing | €250–500+ | Multiple connections, difficult removal, or a larger work area. |
| Kitchen countertop silicone replacement | €120–200 | Length of the countertop and number of connections. |
All prices are indicative and based on examples from Fixmate's service pages. Travel expenses, materials, possible additional costs, and the exact scope of work are confirmed in the quotation. Investigation or repair of waterproofing and moisture damage is not automatically included in silicone replacement.
How to Get an Accurate Silicone Replacement Quote
Providing clear information about the work area helps us prepare a more realistic estimate before visiting your property.
- Take a general photograph of the entire shower corner or other affected area.
- Take close-up photographs of the old silicone, especially where cracking, separation, or discolouration is visible.
- Tell us your city and, if possible, the approximate length of the silicone joints in metres.
- Specify whether you need one joint replaced, several connections repaired, or a larger bathroom resealing service.
- Let us know if you have noticed moisture damage, loose tiles, or other defects.
You can request a quote for professional shower corner silicone replacement or a more extensive bathroom sealing project.
In many cases, a few clear photographs are enough to help determine the expected work and plan an appointment.
How Long Does Bathroom Silicone Take to Dry, and When Can You Use the Shower?
New silicone may form a surface skin relatively quickly, but this does not mean the entire joint has completely cured.
The full curing time depends on the silicone product, thickness of the joint, temperature, humidity, and other installation conditions.
For this reason, there is no single drying time that applies to every bathroom silicone replacement.
For many jobs, it is sensible to plan for at least approximately 24 hours without using the shower. However, the exact waiting period must be determined according to the product instructions and installation conditions.
For example, technical information for Casco Sanitary Silicone describes a curing rate of approximately 2 mm during the first 24 hours under specified test conditions. A thicker joint may take longer to cure completely.
Do not expose freshly applied silicone to water before the installer-recommended waiting period has passed. Premature contact with water or aggressive cleaning may affect the final result.
How to Make Bathroom Silicone Last Longer
- Maintain good ventilation. Allow bathroom surfaces to dry properly after showering.
- Remove standing water. A shower squeegee can help reduce the time water remains on tiled surfaces and joints.
- Clean silicone regularly. Use suitable products that are compatible with the sealant and surrounding surfaces.
- Avoid sharp cleaning tools. Aggressive scraping or unnecessary abrasion can damage the silicone surface.
- Repair damaged joints promptly. Do not simply cover separated or cracked silicone with another layer.
A small black mark does not always reveal the source of the contamination. However, if dark spots repeatedly return shortly after proper cleaning or replacement, the bathroom's ventilation, drying conditions, and possible moisture sources should be investigated.
Should You Replace Bathroom Silicone Yourself or Hire a Professional?
Replacing a short, accessible silicone joint may initially seem like a straightforward do-it-yourself task.
In practice, the most demanding part is often removing the old material completely and preparing the surfaces correctly for new silicone.
In wet rooms, an incorrect removal technique can also damage surrounding materials or the waterproofing system.
Professional assistance is particularly useful when the work involves long floor-to-wall joints, several shower connections, difficult-to-remove silicone, or glass shower screen installations.
Extra care is also important in rented apartments and housing-company properties, where repair responsibilities and required permissions should be clarified before work begins.
If tiles are moving, the material behind the joint appears soft, or there are signs of waterproofing damage, resealing should not be used to conceal the problem.
The appropriate inspection and repair method must be determined first.
Fixmate's silicone replacement service concerns maintenance of visible surface joints. It is not a substitute for repairing damaged bathroom waterproofing.
Frequently Asked Questions About Bathroom Silicone Replacement
How often should bathroom silicone be replaced?
Bathroom silicone may last several years, but replacement should be based primarily on its condition. Cracking, separation from the surface, persistent discolouration, and deterioration are common reasons to consider replacement. Age alone does not determine whether a joint needs renewing.
Can mouldy bathroom silicone be cleaned instead of replaced?
Surface dirt and some stains may be removed using suitable cleaning products. However, if dark contamination is embedded inside the silicone or the sealant has started separating from the surface, cleaning may no longer be sufficient. Replacement is often the more practical solution.
Is silicone sealant the same as bathroom waterproofing?
No. Silicone is a flexible material used to seal and finish joints between surfaces. The actual waterproofing system of a tiled wet room is a separate construction beneath the tiles. Replacing silicone cannot repair damaged waterproofing.
Can I apply new silicone directly over old silicone?
This is generally not recommended when an existing joint is damaged or deteriorated. New silicone requires a suitable, clean, dry surface for proper adhesion. Loose old material and remaining silicone residue should be removed before resealing.
How long does it take to replace silicone in one shower corner?
The required time depends on the condition of the existing silicone, the number of joints, accessibility, and surface preparation. Some jobs can be completed within a few hours, while additional drying requirements or unexpected defects may extend the schedule. The time before the shower can be used is separate from the installer's working time.
When can I use the shower after silicone replacement?
Always follow the manufacturer's instructions for the selected silicone and the installer's recommendations. It is often reasonable to allow at least approximately 24 hours before using the shower, but the exact period may vary according to the product and joint thickness.
Can a tenant arrange bathroom silicone replacement?
In a rented apartment, tenants should first discuss the repair with the landlord and clarify who is responsible for ordering and paying for the work. Housing-company instructions may also apply, particularly when moisture damage or waterproofing concerns are involved.
Can kitchen sink or toilet silicone be replaced during the same appointment?
Yes. Several silicone replacement tasks can be assessed for the same visit. Send photographs of all the areas in advance so we can estimate the required working time and materials.
Book Professional Bathroom Silicone Replacement with Fixmate
Have the silicone joints in your shower become black, cracked, or loose? Are you planning to renew the silicone around a bathroom sink, toilet, or kitchen countertop?
Fixmate provides professional silicone replacement and minor bathroom maintenance services in Helsinki, Espoo, Vantaa, and other areas covered by our service network.
Send us photographs of the affected joints and tell us where your property is located. We will help assess the work, explain what may be required, and provide a price estimate before arranging an appointment.
Request a Silicone Replacement Quote
Please mention whether the work concerns a shower corner, bathroom sink, toilet, kitchen countertop, or several locations. Our detailed service page is currently available in Finnish, but you can contact us in English.
_320x180_030.jpg "Sauna Stone Replacement: Correct Amounts and Sizes for Different Heaters изображение")